
How To Make A Fabric Swatch Book
Some of the links below are affiliate links. As an Amazon Associate I earn from qualifying purchases. This means that, at zero cost to you, I will earn an affiliate commission if you click through the link and finalize a purchase.
Here are a few things you might want to think about when looking at how to make a fabric swatch book.
Firstly, you might not fully understand or get the concept of a fabric swatch book. They are essentially a diary or log of the different fabrics you have bought, used or are documenting.
You can collect samples you have used, going to use or have been given to compile a diary/informational book to hold the details you need. Some of the details I will highlight in this post to help you create a stunning but helpful fabric swatch book.
Do I Need A Fabric Swatch Book?
No- one needs a fabric swatch book but they are extremely handy to have. Especially if you are new to sewing and can often get mixed up and confused with the different fabrics and materials for sale.
Fabrics can vary from one to another and with these small changes can mean that the hang and flow is different, the main purpose of the fabric is different and so not every fabric works well for every style of sewing.
Having a compiled fabric swatch book can help you choose a fabric or compare fabrics from your book to ones you wish to buy to get a good match.
This is also great if you are looking for fabrics to compliment each other from colours to tectures to designs. You can have a swatch in your book and take it to compare alongside other fabrics.
Details To Include In Your Fabric Swatch Book
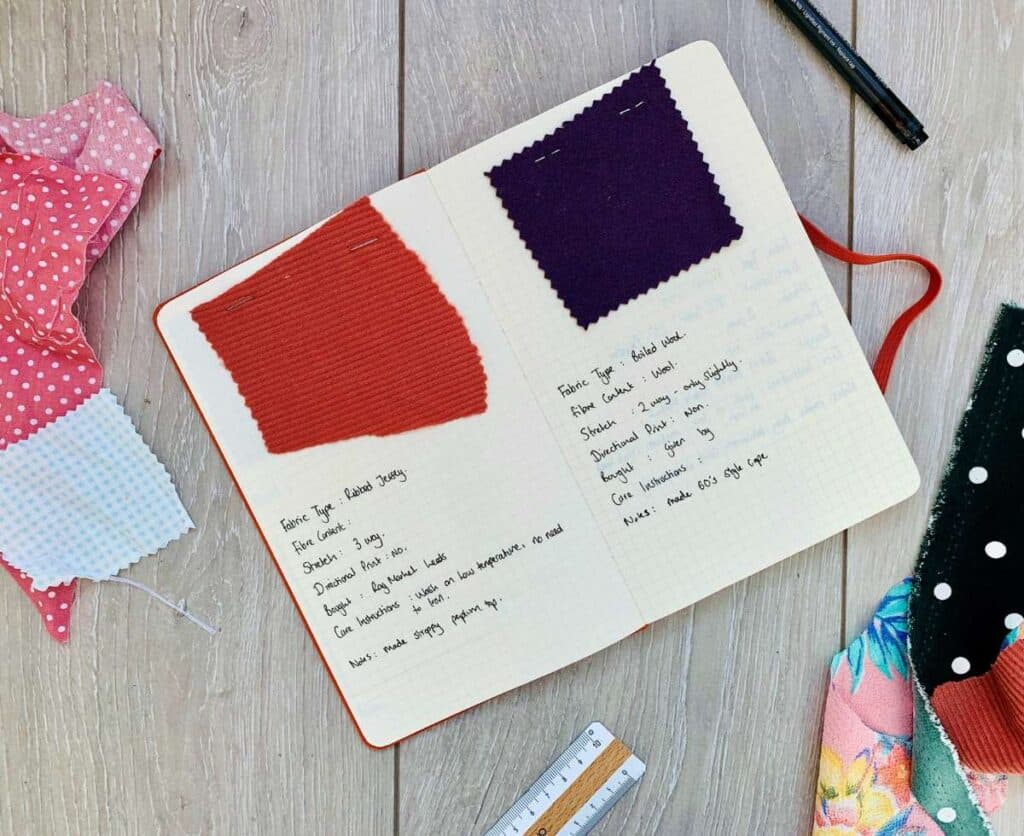
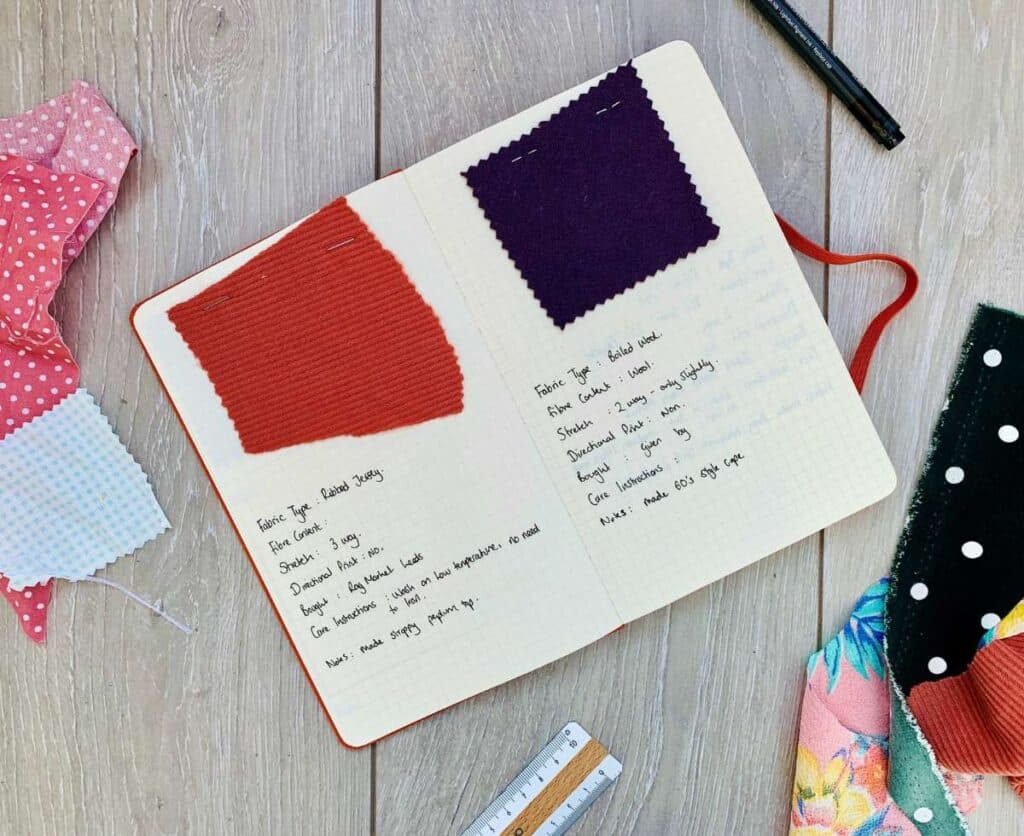
There are certains details you will want to put in your fabric swatch book. These details are essential as it will help you learn more about the fabrics you are using, be able to quickly choose a type of fabric for a future project and know how to care for your fabrics/garments.
Key Information To Include
Firstly there are a few key pieces of information you want to include. These are basic things that will go a long way to keeping your fabric swatch book tidy, easy to use and helpful for future projects.
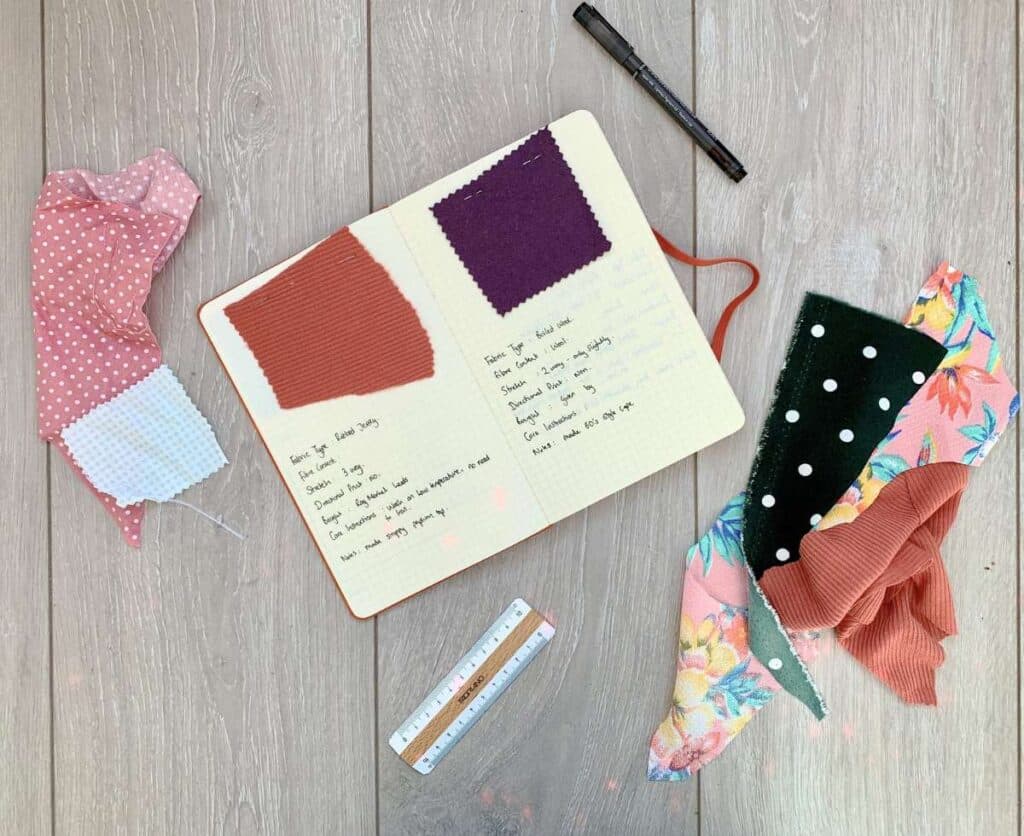
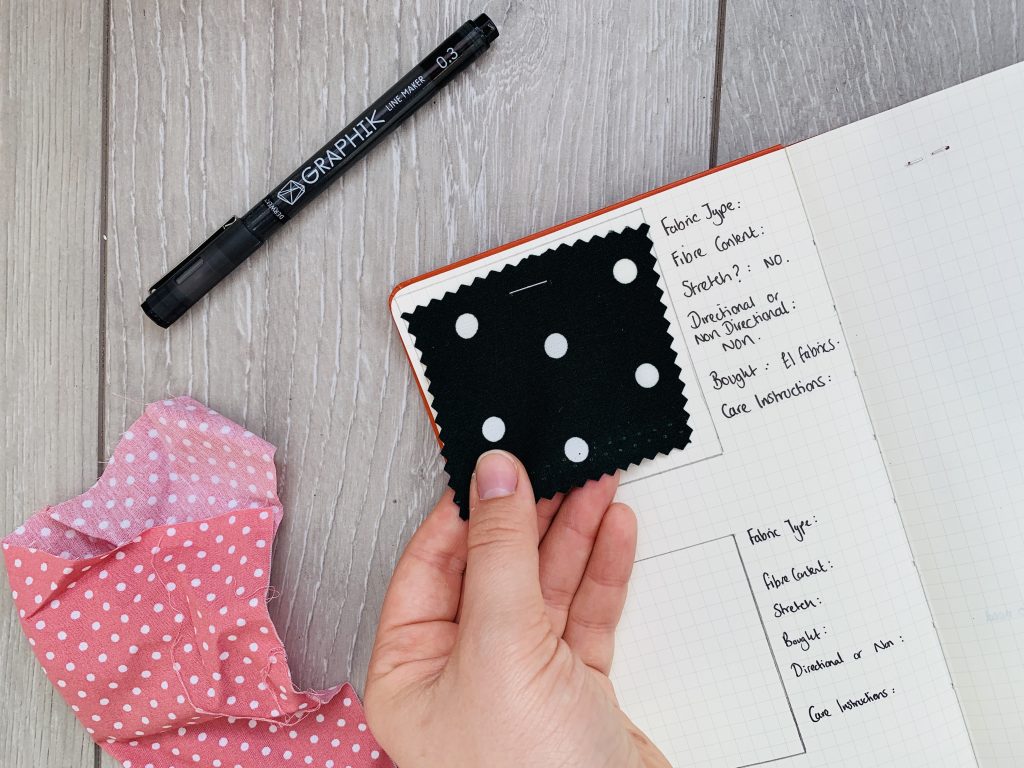
- Name of the fabric
- Fibre content and breakdown – 100% cotton, 45% polyester etc ( ask the vendor or look at the label for this information)
- Where you purchased it from – not essential but can be helpful to see where you can find certain fabrics or to get a repeat of that one you originally bought.
- Care instructions – how to wash it, temperature, dry clean only and ironing – this will help make your fabric last longer.
Non Essential Information But Handy To Have
There are also things to include that can be helpful and fun to include. I like to add in these so I can keep a record of what I bought, used it for and even add in an image so I can see the end result.
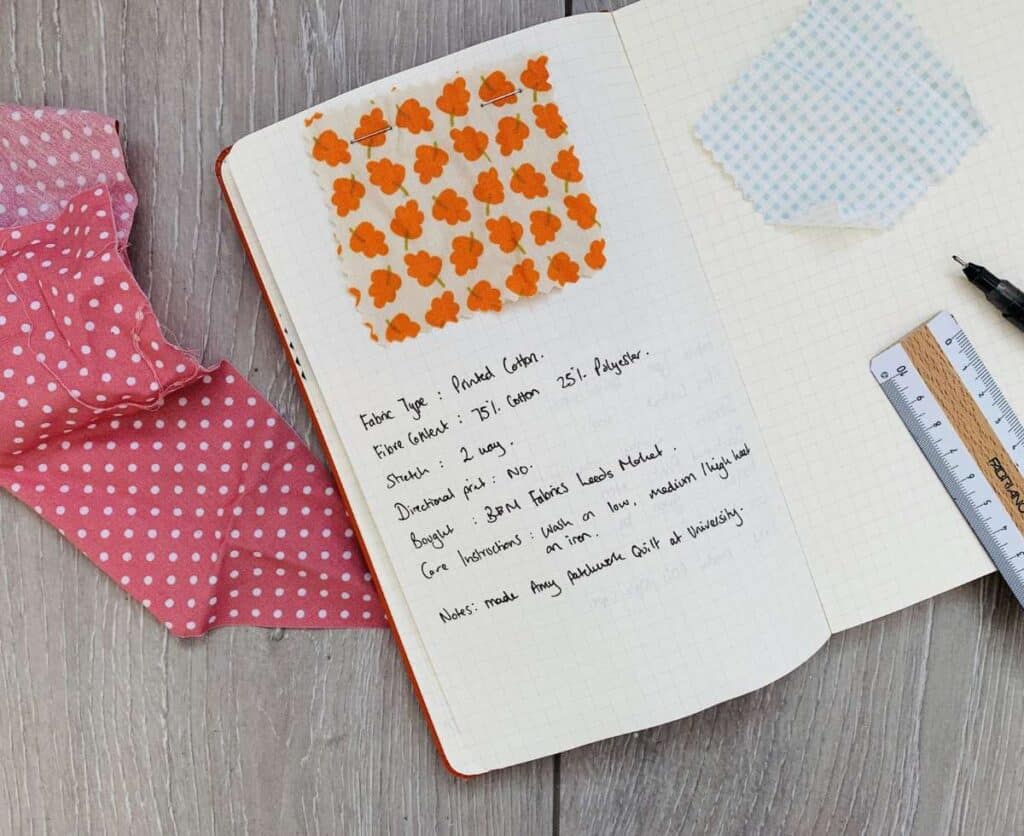
- How many meters/yards
- How much it was per measurement.
- What I used it on – you can include an image of the finished product for fun.
- Name of the design – many prints have special names and designers.
- Does it stretch? – if so is it 2-way or 4-way stretch etc.
- How big is the pattern?
- Is it a directional pattern or non-directional pattern?
- How was it to use? hard, slippery, any additional comments on how it was to sew with and handle.
How To Organize A Fabric Swatch Book?
Honestly, how ever you want.
I have randomly placed my swatches in my pages one at a time as I have collected them. I didn’t want to create a plan for my book as it was very much a working progress.
You can however do it by one of the following ways or create your own way.
- By colour
- By designer
- By Fabric Type eg Cotton, Poplin, Jersey etc
If you are working in a ring binder folder you can adjust your pages to sit in groups each time you create a new entry.
If you are using a book like me you can create tabs to your favourite fabrics or colour code the tabs to reflect the different fabrics you have in your book.
What Size Should My Fabric Piece Be For My Fabric Swatch Book?
This is completely up to you, if you are working on smaller pages or don;t require a huge piece you can do anything as small as a 2-inch squared piece.
Honestly though I like to have more to play with. As when I am choosing a fabric I like to feel it, stretch it and be able to fold it etc. I want to have a fair size piece to be able to know the fabric well.

I feel this is especially important for those who are making a fabric swatch book to learn more about different fabrics and understand more of what each can do.
Tip: I usually start my project with my fabric and then use a small off cut that is too small to use as my swatch for my book. That way I’m not cutting into my fabric and regretting it later.
Anything from a 3-inch squared piece up to 6-inch squared piece is a good size. Some places will offer you a free sample which will be a slither from the edge – that’s still great as you get the length.
If you are buying fabric and creating a swatch for the pattern alone, I would try to make a sample as large as the pattern is (without repeats). If the pattern is quite large, include a photo.
A key thing to remember is that some of these fabrics will fray – you can use a number of techniques to stop your swatch from fraying.
How To Make a Fabric Swatch Book
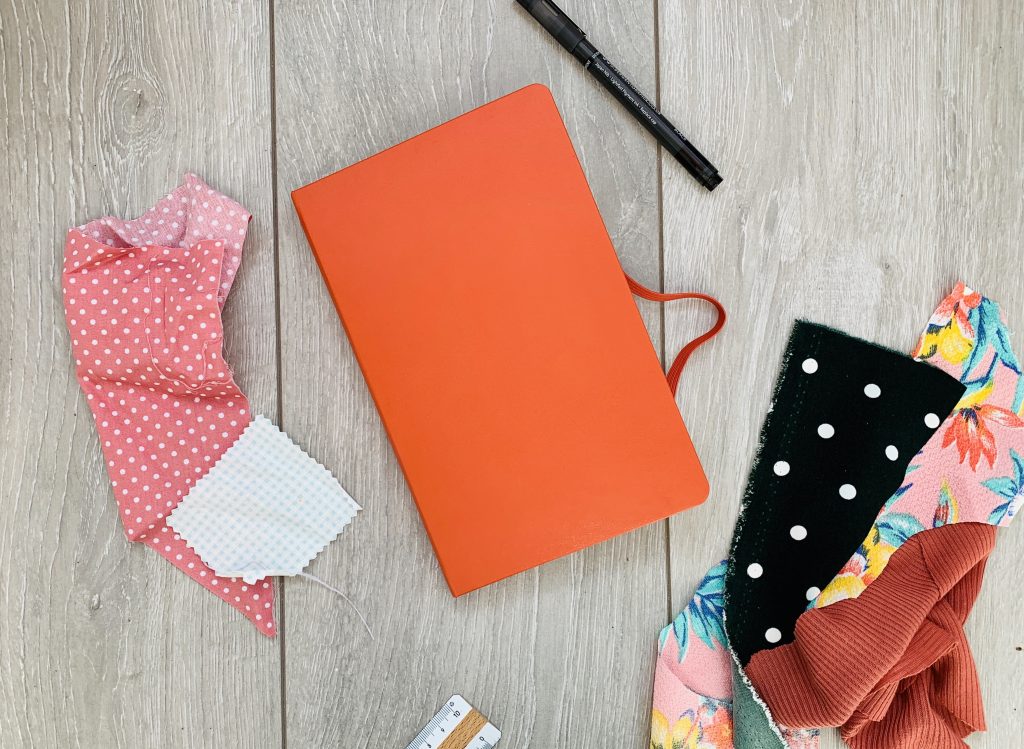
Firstly you want to have something as a base. I am using a leather cover Moleskine book as mine as it was something I picked up in TK Maxx for a couple of pounds and I like Moleskine anyway.
You can alternatively use any kind of notebook or diary, ring binder folder or folder system. Whatever you have and works best for you, use it.
Some people have been creative by using small pieces of card with a hole punch through and attached together using a clip, ring or keyring to hold them in place. I love the design of this but would be worried about losing a fabric or them getting worn away from exposure.
If you are looking at using a folder or ring binder format look at using my helpful free downloadable to print off and use as a base.
Before jumping in you want to look at how many fabric swatched you are putting to a page. A4 pages can maybe get anything up to 4 per page and smaller pages like A5 would be anything up to 3 on a page.
Personally I chose to put 2 to a page so I had room to include an image of the finished product.
First you want to create a space in which your fabric will be placed. You can draw out a square or space on your page to place your fabric swatch.
Tip: Don’t stick the entire piece of fabric down to the page, that way you can lift it and feel it and move it to really test if it is suitable for your poject.
Next you want to make a note of the information you want to include from above. You don’t have to put in everything that I have listed and can pick and choose what you want to know and keep in your fabric swatch book.

Make space for those using a ruler and pencil to create lines or you can used lined pages. Write in your titles which would be; fabric content, type of fabric, price paid etc.
Place in your fabric and relevent information. I would recommend using a stapler to hold your fabric in place as it is easier to use, less messy and will hold for longer.
It may cause some extra thickness in your book but will be worth it when you haven’t got pages sticking together.
Carry on including fabrics in your new fabric swatch book and document your sewing journey.
That is everything for how to make a fabric swatch book, I hope you have found this useful and helped you get started on making your own and documenting your sewing journey.
If you have any further questions please leave me a comment and I can get back to you!

