
How To Make A Cutlery Roll – Perfect For Picnics!
Some of the links below are affiliate links. As an Amazon Associate I earn from qualifying purchases. This means that, at zero cost to you, I will earn an affiliate commission if you click through the link and finalize a purchase.
Are you looking at how to make a cutlery roll?
Whether you are looking for yourself, to make as a gift or just testing out your sewing skills this is a great simple project to do.
A cutlery roll is so much fun and you can use the same concept of this tutorial to make a number of things from a toothbrush and toothpaste roll, wash bag style roll or even a jewelry roll.
More and more people are using reusable cutlery while out in their home towns, while travelling and at festivals. For a number of reasons from personal hygiene, easy of use and to help save the planet from single use plastic.
There are more and more reasons to be using our own cutlery where ever we go. So I decided to make us a little cutlery roll to keep our cutlery sets clean and organized.
What Is A Cutlery Roll?
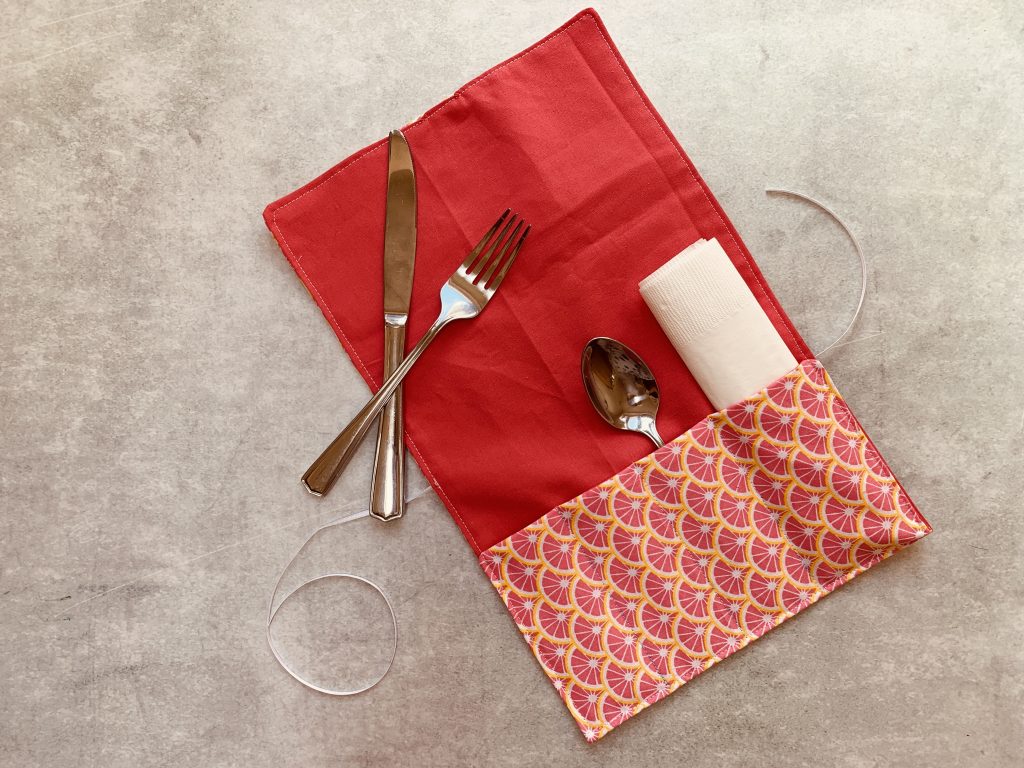
A cutlery roll is pretty much what you might think, it is a a fabric base which has pockets on that hold your cutlery and can be rolled up.
It can be made from cotton, towelling or other materials. You can often buy them but it is more fun to make your own. You can add is a removable towel or piece of fabric to use as a napkin or even to clean them off once you are done using them.
These are perfect for traveling, picnics or hiking and outdoor adventures. We often travel with a reusable cutlery set but they can get dirty and worn and often end up stuck at the bottom of our bag.
These are handy for days out, picnics, they make a great present and great if you like to go walking and hiking.
Tools & Equipment
- Scissors & or Rotary Cutter
- Tape Measure
- Quilting Ruler – helps to create clean accurate lines
- Fabric marking tool
- Fabric
- Lining fabric
- Sewing Machine
- Thread
- Pins or sewing Clips – I love using clips as they are easy to use and quick to remove.
- Ribbon or String
If you are new to sewing and are looking to build up your sewing kit, I have a whole post on essential items to get you started.
How To Make A Cutlery Roll
Cutlery rolls are super fun and practical, you can make them in funky fabrics or just whatever you have at home. I grew up camping, walking and spending a lot of time outdoors so we often had picnics and meals on the go.
We had so much fun doing it and my Auntie would bring a set of plates and cutlery for everyone (very organized). My parents still enjoy walking so I thought making them a cutlery roll to take with them while they go walking would be a nice gift.
Step One
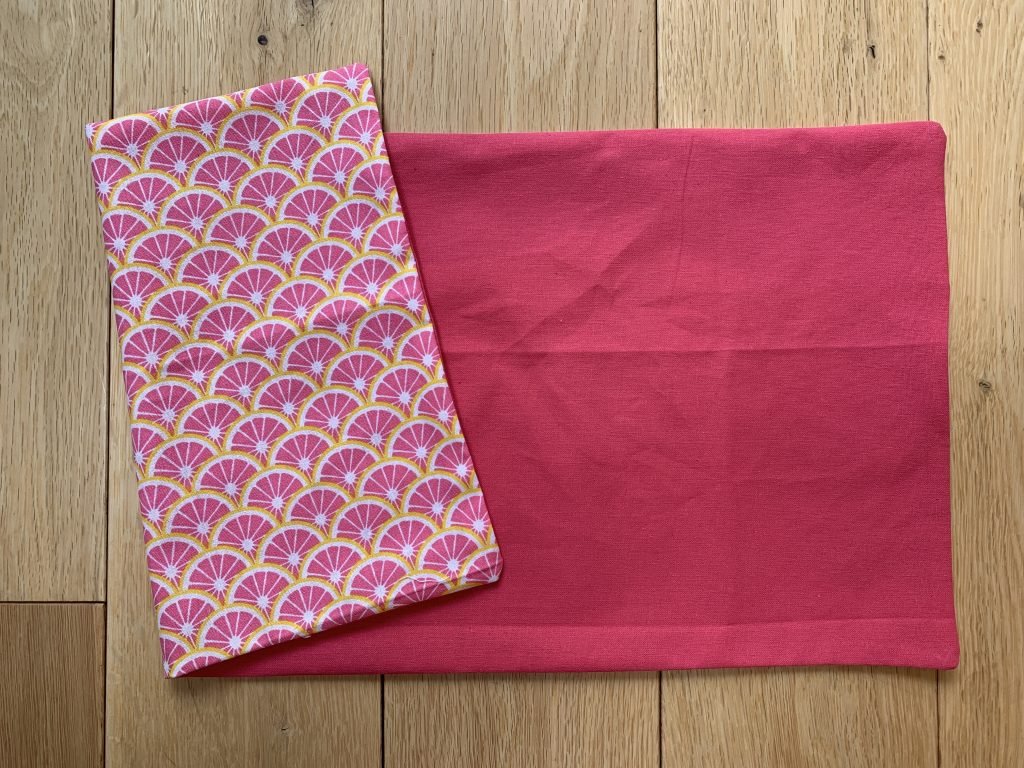
Start by cutting 2 square in your chosen fabric measuring 10 inches by 20 inches. Start by squaring off your fabric with a set square or quilting ruler so your lines are straight and at a 90 degree angle.

Tip: Make sure you iron your fabric first before making anything. That way when you wash your cutlery roll it is less likely to shrink.
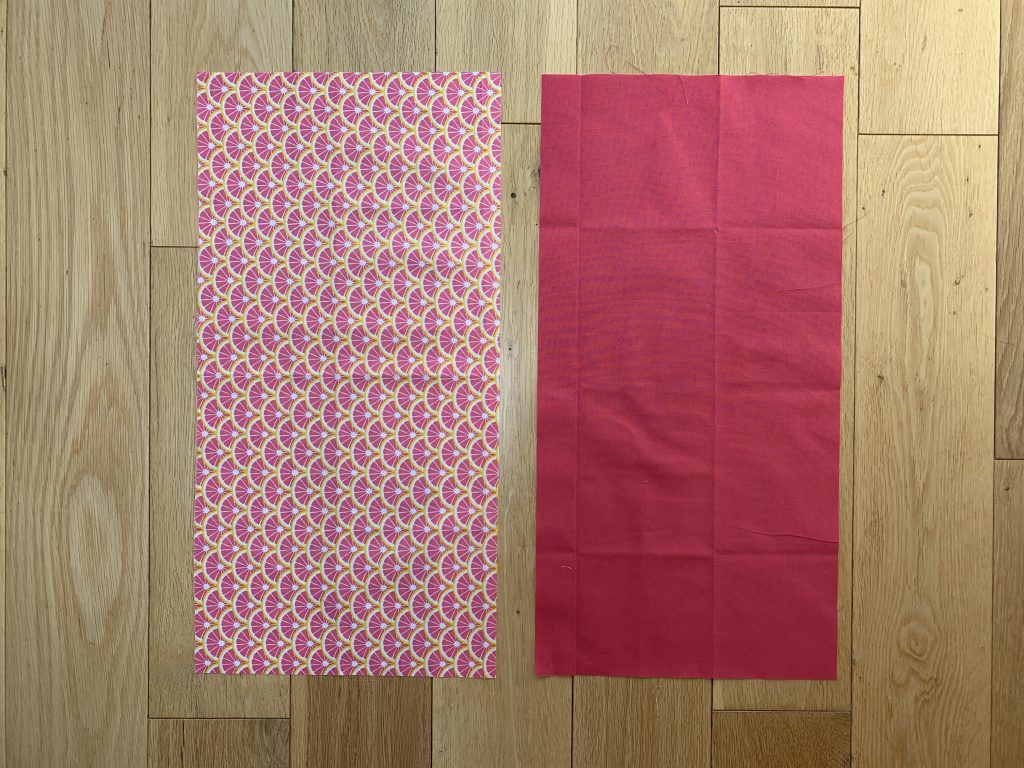
This part is optional within the tutorial but it helps to give the cutlery roll a little padding. Cut the same size piece of 10 inches by 20 inches into the wadding.
If you are using a towelling fabric cut one piece of 10 by 20.
Step Two
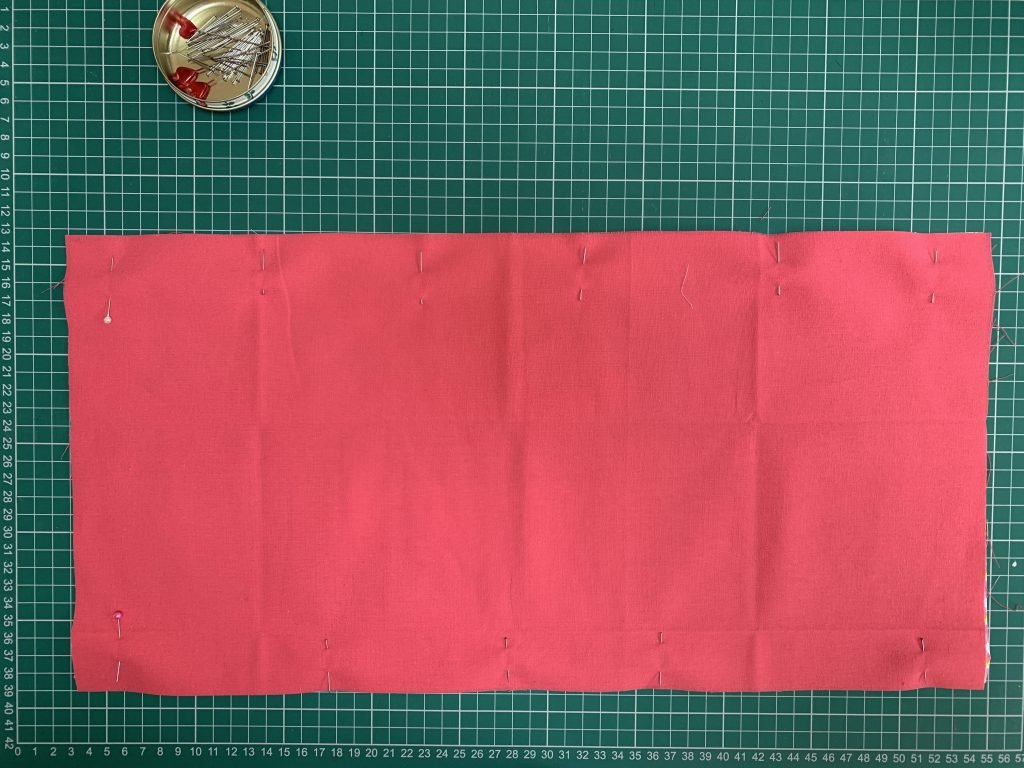
The next step is to layer up your 2 pieces of fabric and wadding.
Place the 2 pieces of fabric together, make sure the right sides of the fabric face inwards to each other.
If you are using wadding make sure it is on the wrong side of the fabric on either side. When turned through it will then be sandwiched inbetween the fabric layers.
Tip: To stop your wadding and fabric from moving look at using a fusible wadding that you can stick to your fabric making it easier to sew.
Pin or clip around the edge to hold the layers in place.
Sew around the edge using a 1/4 inch seam, make sure you leave a 2 – 3-inch gap on one side open ready to turn through.
Tip: Make sure you backstitch the start of your seam and the end. You don’t want your stitches to unravel when you are using your cutlery roll.
Step Three
Trim the corners of the fabric on the diagonal to get rid of any bulk.
Turn through the fabric to the right way out.

If you used wadding it should now be sandwiched in between your two pieces of fabric.
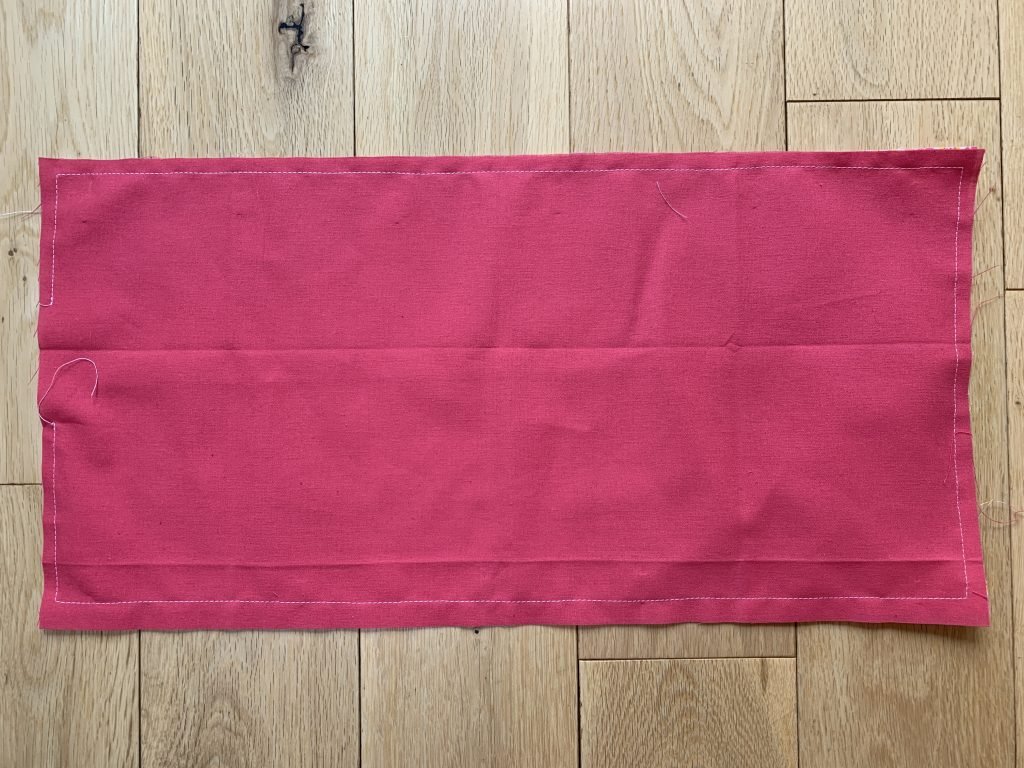
Take it to the ironing board and give it a good press to make the seams and edges crisp.
Step Four
Find the open gap and fold the raw edges inwards to match the rest of the edge/seam. Sew with a hidden/blind stitch or what I call a slip stitch.
Tip: Use matching thread so it easily blends into the colours of the fabric.
Fold from the shortest end upwards 5 inches. This is the section that will become the pockets for your cutlery.

Line the edges up together and pin or clip in place ready to sew.
Step Five
Sew up the edges with 1/4 inch seam and follow around to sew all the edges in a continuous line.
This will hold the fold in place and also look decorative on the other parts of the cutlery roll.

Then measure 5 inches down from the top of the cutlery roll towards the pocket. Mark at intervals 5 inches and draw a line across with a fabric marking tool.
Sew along that line with a standard straight stitch. That section will then be the flat to fold down over the cutlery to hold it in place.
Step Six
One of the last steps for how to make a cutlery roll is to sew in the lines to create pockets to hold the cutlery.
Place your cutlery on the fabric to make an accurate measurement of how the cutlery will sit.
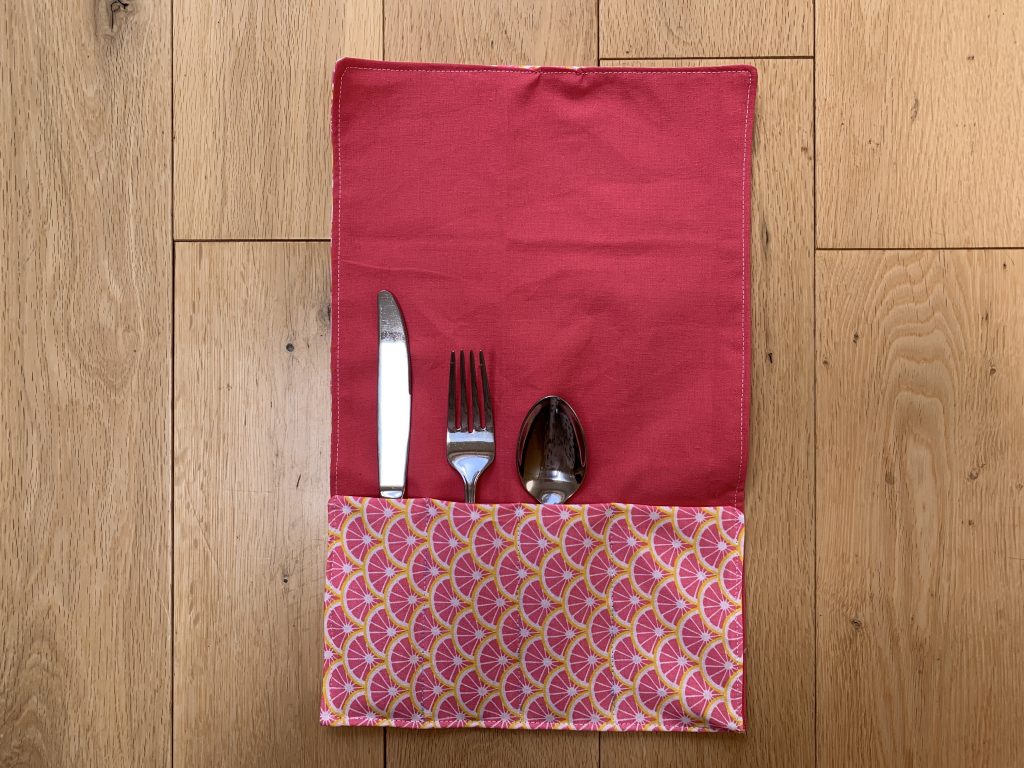
Tip: If you have spare space create an extra pocket for a reusable straw, napkin or chopsticks!
Mark each line with a pin or with a fabric marking tool. Using a ruler continue the line down from the top of the pocket to the bottom.

Sew each line with a standard straight stitch. Make sure you smooth out the layers as to not catch anything else while you sew.
Step Seven
Cut a piece of ribbon or string 20 inches long to attach to the back of the cutlery roll.
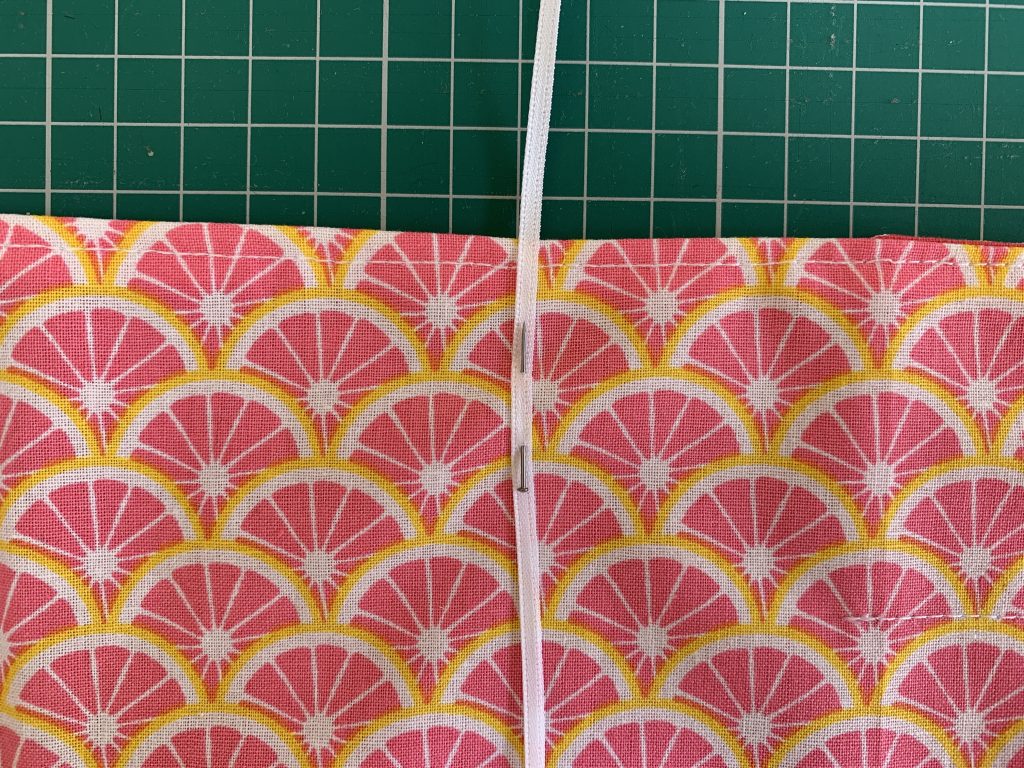
Place it on the seam edge from where you topstitched the layers in step five. Pin in place and sew with your sewing machine or by hand.
Finish the edge of the ribbon to stop it from fraying and your are done!

Pop in your cutlery and get ready for a picnic.

I hope you have enjoyed learning how to make a cutlery roll and have had fun making yours. If you have any tips on how you made your cutlery roll unique and personalized I would love to know!

