
How To Make A Sewing Machine Mat With Pockets
Some of the links below are affiliate links. As an Amazon Associate I earn from qualifying purchases. This means that, at zero cost to you, I will earn an affiliate commission if you click through the link and finalize a purchase.
Looking at how to make a sewing machine mat with pockets?
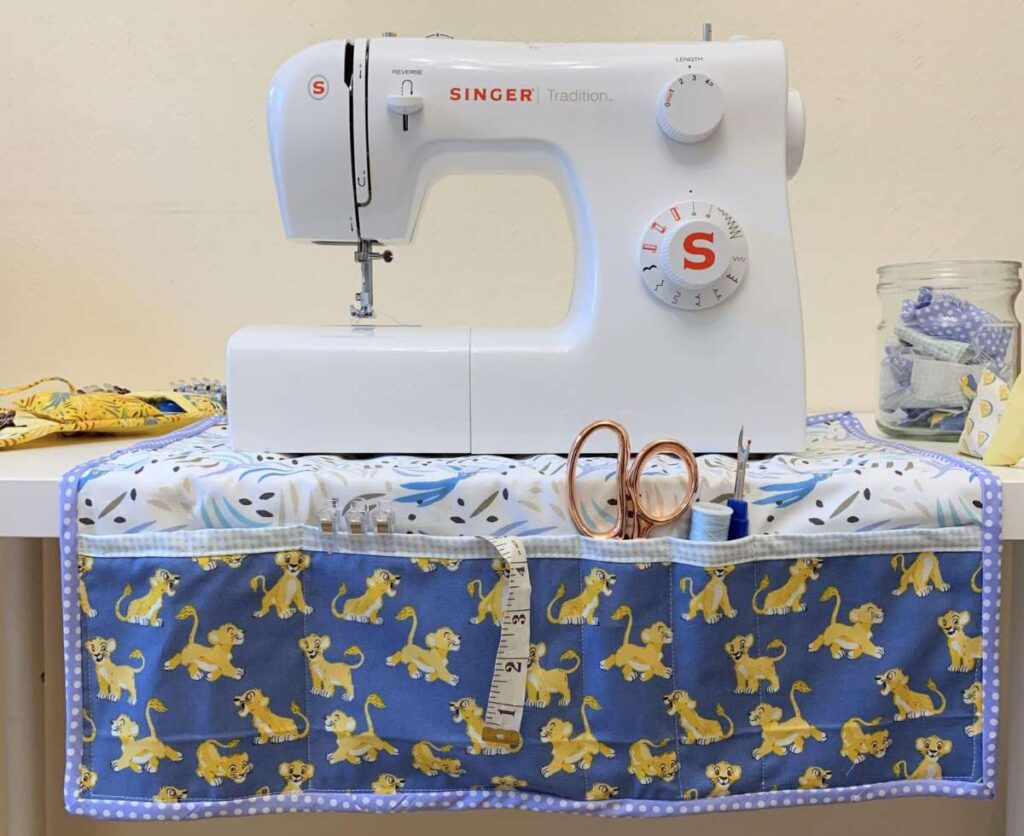
I have awed and ooh’d at these beautifully quilted sewing machine mats with the cute little pockets to hold your scissors and clips. I just love them! They are so practical and so adorable I just gave up the fight and decided to try my hand at making one.

I also got so carried away making different style of sewing kits and organisation that it fits to make one of these too! If you spouse asks why your making ANOTHER organizer just say ‘ it is to stop the pins from going on the floor’ then you should be able to get away with it!
Tools & Equipment
- Fabric – You can make this using 3 fat quarters or fabric similar size
- Scissors/ Rotary Cutter
- Pins & Sewing Clips
- Bias Binding – I personally would make your own as it is easier to use while sewing.
- Tape Measure
- Ruler – I prefer to use a quilting ruler as I can measure accurately at the same time.
- Sewing Machine
- Cutting Mat – this is not essential but I love using a cutting mat, mostly to protect my dining room table!
How To Make A Sewing Machine Mat With Pockets
There are a number of advantages to making this sewing machine mat, don’t forget to read this loud for your other half to hear! Things such as the padding in the mat helps reduce noise from the sewing machine.
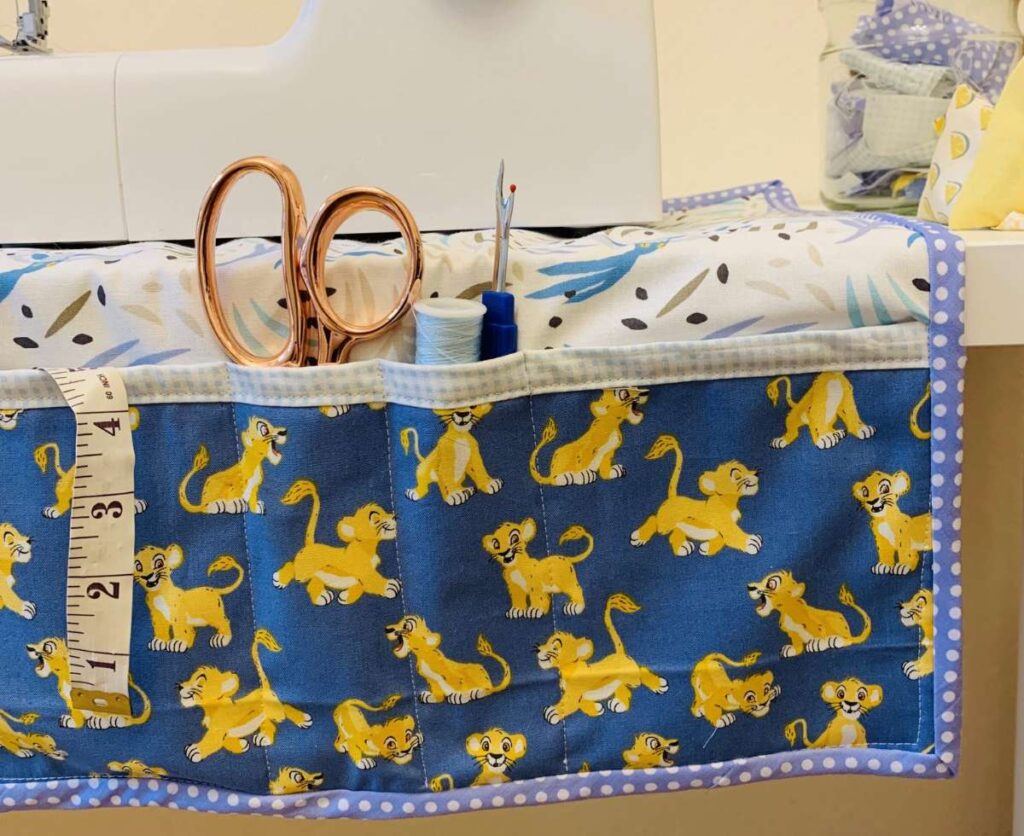
It also helps keep your sewing space tidy and makes sewing easier and more efficient. If like me you have a set station you leave out all the time this is perfect as you can leave everything tidy in the pockets and come back when you are ready.
I also really like it as I often use sewing clips when sewing so I can take off the clip and drop it into the pocket with no issues and I can carry on sewing!
You can also avoid knocking off pins, pin cushions and scissors with your project that are on the table… I have done this countless times and luckily always missed my feet!
Step One
Start by cutting the following pieces:
2 x 18 by 21 (roughly a fat quarter) I used a fat quarter for the front and scrap fabric for the back. This will be the main base part of the sewing mat.

Cut one 18 by 21 square into the wadding. You can use any you have on hand but if you are buying some I suggest getting a medium weight or thinner.

If you go for a medium and find it too thick you can often pull the layers apart to thin it down.
Tip: Make sure your fabrics are pressed and ironed before cutting as that will eliminate any wrinkles and puckers.
2 x 6 by 21 in a different fabric. This will be the pocket to hold all the different items such as scissors and fabric scraps.
Cut one 6 x 21 rectangle of wadding to go between the pocket fabric layers.
Step Two
Place the base layers together, starting with the bottom fabric (yours may be the same, mine was different as I didn’t have enough)

Place the first piece of fabric face down on your work surface, then layer the wadding on top and finally place the last fabric piece on top face up.
Pin around the edge and in the centre to hold the layers together.
Tip: If you want to stop the layers from moving while you quilt or work on sewing together you can use a fusible wedding to hold the layers in place.
Repeat the same process for the pocket pieces. Making sure they are well pressed and wrinkle free.
Step Three
In this step you can quilt your base piece and pocket pieces or you can sew around the edges to hold them together.

I chose not to quilt mine so that the thickness was puffy and cushioning for the sewing machine.
Whether you are a beginner or a pro, you can choose whichever way is easiest or that suits you.
Tip: If you plan to quilt your base piece remember to use pins to hold the layers together and to quilt from the centre outwards.
I chose to stick to lines in a diagonal formation so I could accurately draw on the lines to follow.
Step Four
Now you need to bind the top of your pocket piece with bias binding.
You can buy store bought binding but it is often quite stiff and made in thick woven material and doesn’t often compliment your work.
I always suggest making your own binding as it is simple, it doesn’t take too long and you can use any fabric you have to hand. Make the binding 2 inches thick to give you room for trimming etc.
I have a really helpful tutorial on how to make bias binding if you have never made your own before.
Before making your binding you need to measure the length of your pocket. If you are using the same binding on the outside perimeter of your sewing machine mat then you will need to measure that too.

Measure the length you need and add on roughly 8-10 inches. This will give you a little extra to work with to manoeuvre around the corners and in case anything goes a little wrong.
Cut the exact length you need to bind the top of your pocket as you don’t need to worry about creating neat edges here, they will be covered later on.
Step Five
Place the strip of bias binding right side facing down onto the pocket piece. Remember to keep the layers together and this is to create a neat edge over the top.
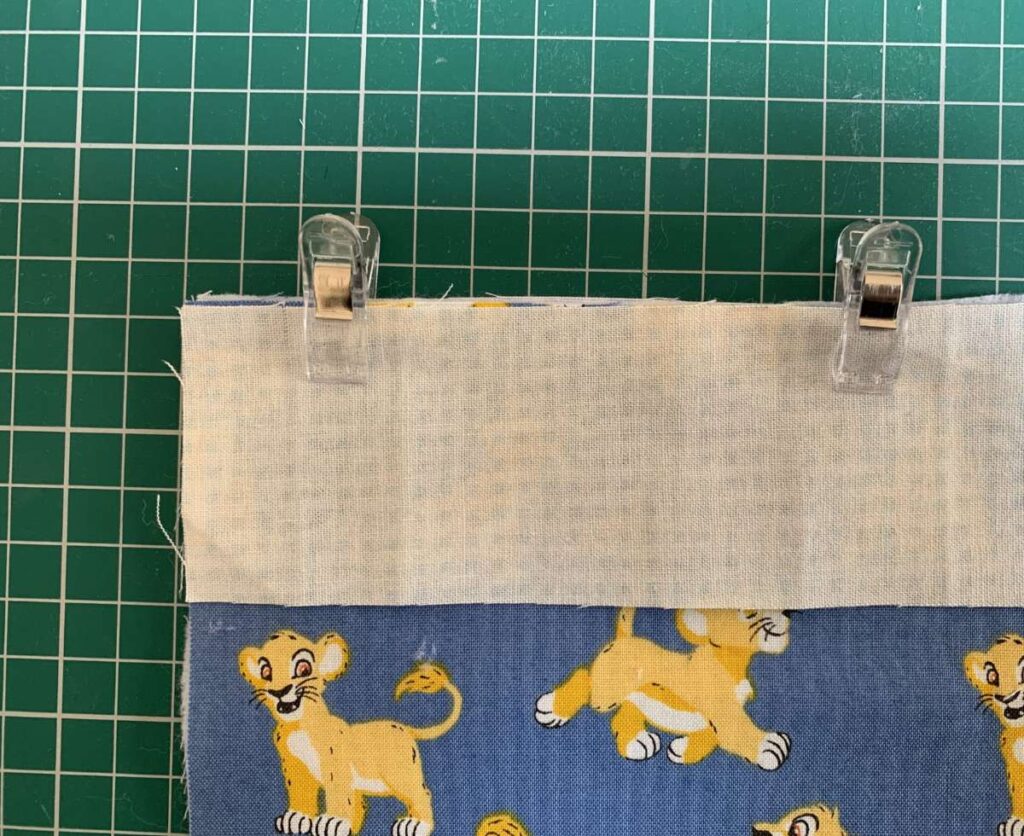
This will make a cute trimming for the pocket and also help contain the raw edges and stop the fabric from fraying.
Pin the binding in place and sew with a 1/4 inch seam. Once you have sewn the binding in place take to the ironing board and press the binding over the seam.

Following the creases of the binding fold the raw edge under and fold again to meet the stitch line on the opposite side.
You should then have roughly 1/4 inch trim of bias binding along the top edge of your pocket.
Step Six
Trim any loose threads or uneven edges on both the pocket piece and base piece before sewing together.
Take your pocket piece and place it on your base piece. Make sure to line up the side edges and bottom edge so it is straight and accurate.
Pin in place or use sewing clips ready to sew together. Sew with a 1/2 inch seam allowance.
Step Seven
To create the smaller individual pockets you will want to measure how wide you want them and mark with a fabric marking tool. Mark at the top of the binding and at the bottom where the stitch line will end.
I used things like my scissors and clips to create the right size pockets for what I wanted to use them for.

Do this to create the right number of pockets you need. You can also mark them with a pin but that is hard to take out while sewing.
Tip: Make sure you aren’t left with an odd unusable pocket at one end. If you have that sort of space, use it for a seam ripper or make your other pockets larger to use up that unused space.
Sew with a running stitch and matching thread from the top point to the bottom. This will create individual pockets to use while sewing.
Step Eight
Make the bias binding for the outer perimeter of your base piece. Measure the length of each side and add the amounts together. Make sure to add on an extra 8 – 10 inches to allow room for the binding to go around corners.
Start by folding back 1/2 inch of binding to create a neat edge. Then place the binding right side down onto the sewing mat.
This is going to be the trickiest part of our how to make a sewing machine mat with pockets tutorial.
Tip: Never start a bias binding on a corner, always start on a long edge as you can then give yourself room to navigate the corner to create a mitred corner.
Continue pinning the binding along the length. Sew the binding on following the ditch you created with the bias mouse. When you come to a corner stop 1/4 inch from the edge, leave the needle in and lift the foot.

Fold the bias back onto itself but in a diagonal,hold in place and take the rest of the binding vertically up so that the bias binding and the edge of the mat are parallel.

Hold in place and drop your foot back down, sew on a usual until you reach the next corner.
Repeat for the other three corners.
Step Nine
Using the iron push the binding over to cover the raw edge of the sewing mat. The iron will help press the seam and neaten the edge, pull the remaining binding over to the other side.
Fold the raw edge under following the crease from the bias mouse. Pin the edge to meet the previous sewn line. This will leave you with a bias width of 1/2 inch thick.

Pin or clip the remaining bias in place and don’t forget to fold the corners so that they lay flat.
You can either sew in place by hand with a slip stitch or you can sew in place with the sewing machine and top stitch in place.
Once you have sewn your bias in place, you are done!
That is how to make a sewing machine mat with pockets, I hope you have found this tutorial helpful. If you have made your own sewing machine mat let me know what you use your pockets for.

